
Getting started with Code Coverage in CodeScene
This guide helps you set up code coverage in CodeScene as quickly as possible. By the end of this guide, you will have:
Generated code coverage data in your CI pipeline.
Uploaded the results to CodeScene with the Coverage CLI.
Run or waited for a new CodeScene analysis.
Verified the results in the Code Coverage dashboard and Explore view.
What CodeScene does
CodeScene does not generate code coverage data itself. Your test tools generate the coverage report, and CodeScene ingests that data so you can visualize and explore it.
The basic workflow is:
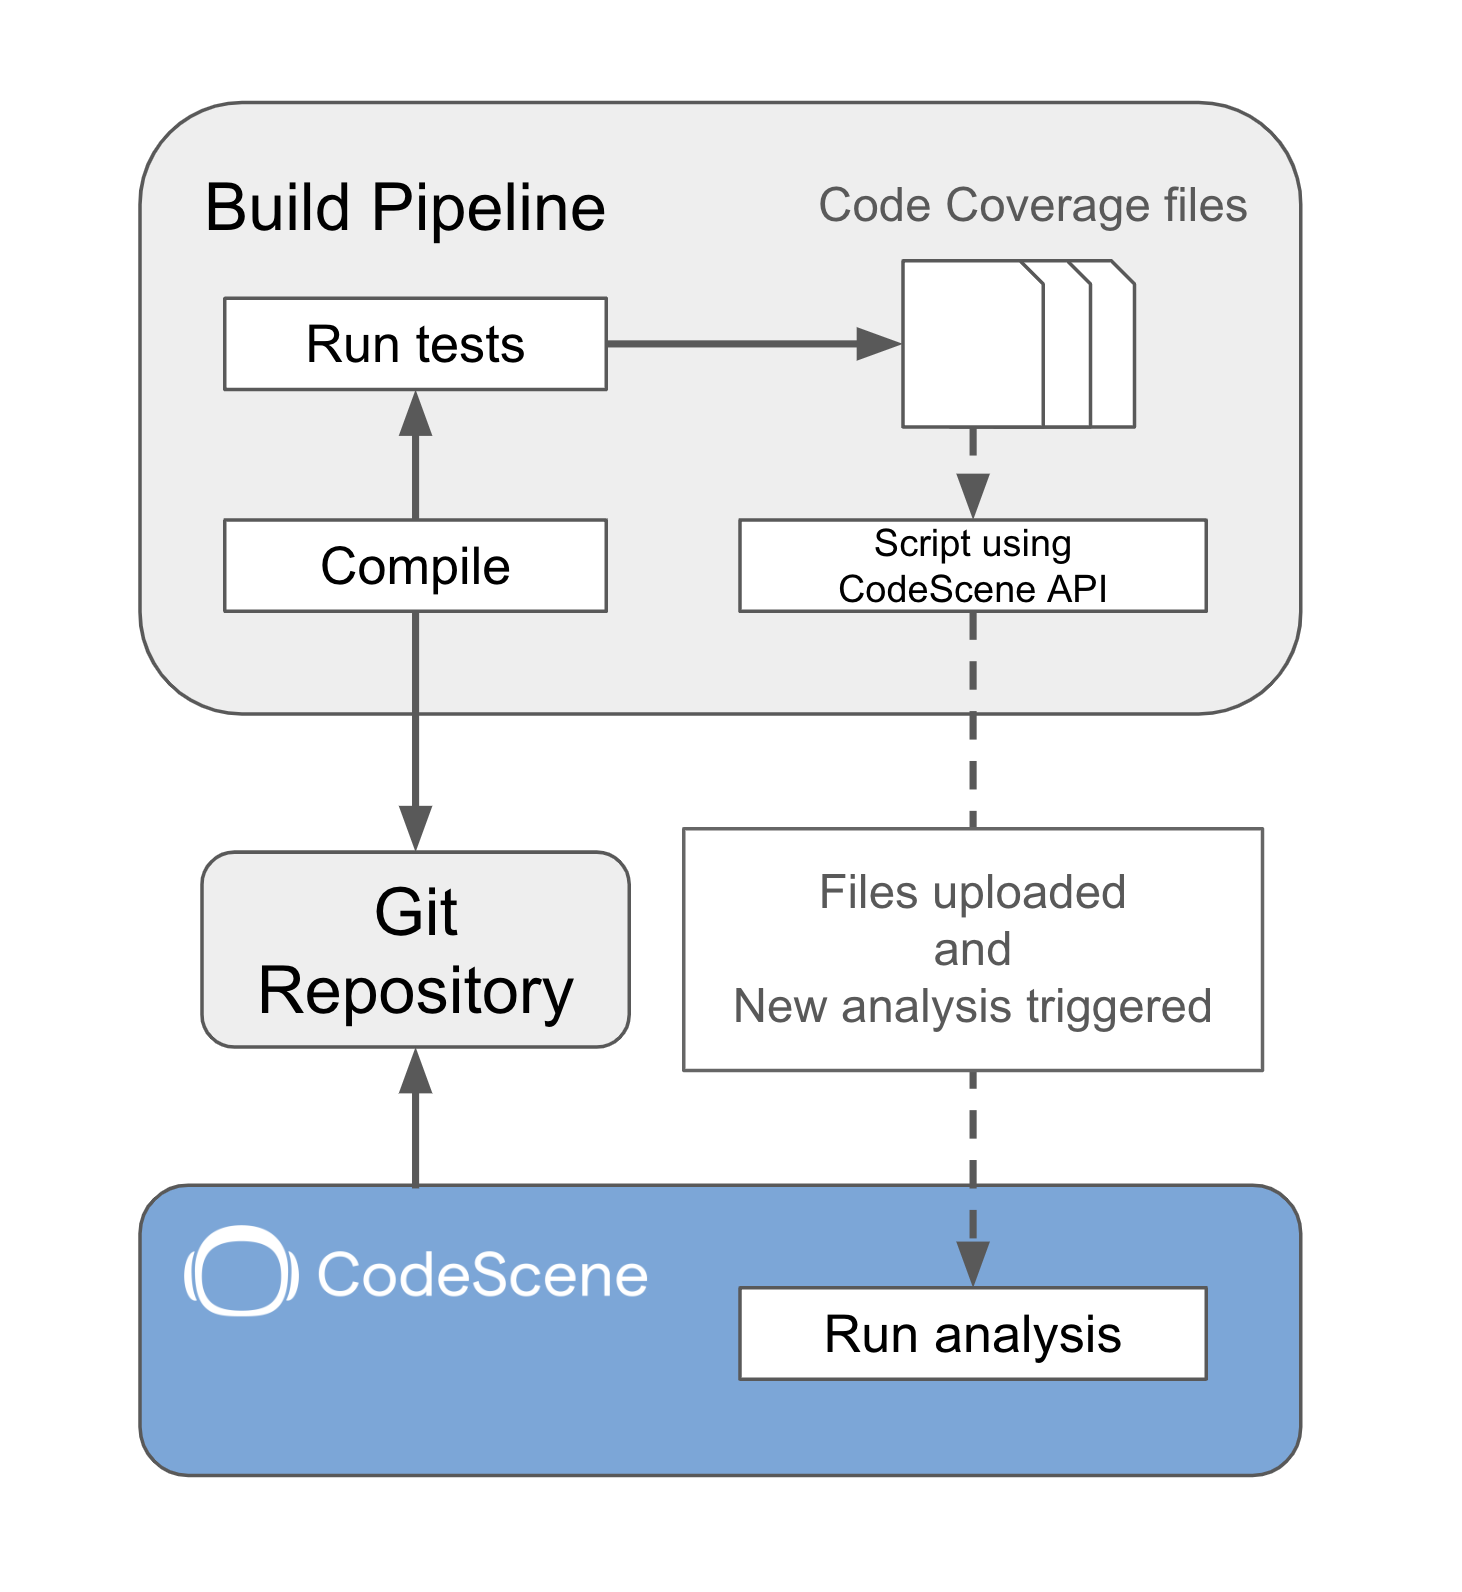
Fig. 184 Generate coverage in CI -> Upload it to CodeScene -> Run a new analysis -> Verify the results in CodeScene.
If you want to check or block pull requests based on coverage, use the separate guide: Check Code Coverage in Pull Requests and Merge Requests. This guide focuses on uploading coverage data so it can be visualized in CodeScene.
Before you start
Make sure you have the following in place:
A CodeScene project that already analyzes your repository.
A CI/CD pipeline that runs your tests.
A coverage tool that outputs a format supported by CodeScene.
An access token for the Coverage CLI.
Git available in the environment where
cs-coverage uploadruns.
Supported formats and metrics
CodeScene supports multiple coverage formats and metrics:
Format |
Metrics |
|---|---|
|
line-coveragebranch-coveragefunction-coverage |
|
|
|
line-coveragebranch-coverage |
|
line-coveragesequence-point-coveragemethod-coveragebranch-coverage |
|
line-coveragemethod-coveragecondition-coveragestatement-coverage |
|
line-coveragestatement-coverage |
|
line-coveragesequence-point-coverage |
|
line-coveragemethod-coveragecondition-decision-coveragedecision-coverage |
A single upload includes every metric that the report contains, for example both line and branch coverage from an LCOV report. Each metric appears as a separate coverage type on the interactive hotspot map in CodeScene.
Step 1: Create your access token
The Coverage CLI requires an API Token, which can be created at API Tokens.
Then configure the required environment variable:
CS_ACCESS_TOKEN— your API Token.
Linux/macOS:
export CS_ACCESS_TOKEN=<your-api-token>
PowerShell:
$env:CS_ACCESS_TOKEN = '<your-api-token>'
Command Prompt:
set "CS_ACCESS_TOKEN=<your-api-token>"
Note
In Command Prompt, make sure not to put spaces around the
=. Writingset "CS_ACCESS_TOKEN = ..."creates a variable name with a trailing space and a value with a leading space, which causes the CLI to fail.Some token characters may need escaping depending on your shell. See escaping details for Linux shell, Windows Command Prompt, and Windows PowerShell. If authentication fails unexpectedly, check for special characters in the token.
Step 2: Install the Coverage CLI
Install the CodeScene Coverage CLI tool in the environment where your CI pipeline runs the coverage upload. The easiest option is to use the install script. If your environment does not allow install scripts, you can also download and install the binary manually.
Option A: Install with the script
Linux, macOS, and Windows with WSL:
curl https://downloads.codescene.io/enterprise/cli/install-cs-coverage-tool.sh | sh -s -- -y
PowerShell:
Invoke-WebRequest -Uri 'https://downloads.codescene.io/enterprise/cli/install-cs-coverage-tool.ps1' -OutFile install-cs-coverage-tool.ps1
.\install-cs-coverage-tool.ps1
To verify the installation:
cs-coverage version
Option B: Manual installation
Use manual installation if you cannot run the install script, for example in restricted on-prem environments or locked-down CI runners.
Download the correct
cs-coveragebinary for your operating system and architecture.Extract the archive if needed.
Move the binary to a directory on your
PATH.Verify that the command works.
Linux/macOS example:
chmod +x cs-coverage
sudo mv cs-coverage /usr/local/bin/

cs-coverage version
Windows PowerShell example:
# Place cs-coverage.exe in a folder such as C:\tools\cs-coverage
# Then add that folder to PATH for the current user.
[Environment]::SetEnvironmentVariable(
  "Path",
  $env:Path + ";C:\tools\cs-coverage",
  "User"
)

cs-coverage version
If cs-coverage version is not found, check that the binary location is included in PATH and restart the terminal or CI shell session.
CI-friendly installation without sudo
Some CI environments do not allow sudo or global installation. In that case, install the binary into a local tools directory and add it to PATH for the current job.
Example:
mkdir -p .codescene/bin

# Download or copy the cs-coverage binary into .codescene/bin

chmod +x .codescene/bin/cs-coverage
export PATH="$PWD/.codescene/bin:$PATH"

cs-coverage version
Use this approach when the CI runner is ephemeral or when you want the installation to be fully contained inside the workspace.
Version stability and the full command reference
By default, the install script and manual download links resolve to the latest release. To pin a specific CLI version, pass the version as the final argument to the install script (for example curl https://downloads.codescene.io/enterprise/cli/install-cs-coverage-tool.sh | sh -s -- -y 1.0.40 or .\install-cs-coverage-tool.ps1 1.0.40; see CodeScene Coverage CLI tool for details). You can also download the binary once and cache it in your CI system (see the GitLab CI example below) so the same binary is reused across runs until you deliberately update it.
To see every available flag for cs-coverage upload, cs-coverage check, and other subcommands, run cs-coverage --help or cs-coverage <command> --help (for example cs-coverage upload --help).
Step 3: Generate coverage in your CI pipeline
CodeScene does not create the coverage report. Your build or test step must generate it first.
Examples:
JavaScript/TypeScript projects often produce LCOV.
Java projects often produce JaCoCo XML.
.NET projects may produce OpenCover or dotCover output.
If your repository contains multiple languages or multiple independently generated reports, you may need multiple uploads.
Step 4: Upload coverage to CodeScene
Upload coverage from the repository root after the coverage report has been generated.
Upload command examples by format
Use the format and file path that match the report your test tooling actually generates. --format defaults to lcov, so you must set it for any other format. You do not need to select a metric: CodeScene uses every metric that the report contains, so one upload per report is enough.
# LCOV (the default format)
cd /path/to/your/repository
cs-coverage upload coverage/code-coverage.lcov
# JaCoCo
cd /path/to/your/repository
cs-coverage upload --format jacoco target/site/jacoco/jacoco.xml
# Cobertura
cd /path/to/your/repository
cs-coverage upload --format cobertura coverage/cobertura-coverage.xml
# OpenCover
cd /path/to/your/repository
cs-coverage upload --format open-cover TestResults/coverage.opencover.xml
Important rules for uploads
The coverage data in CodeScene is not tied to a specific project. Instead, uploading coverage data for a repository means it will automatically be available for all projects analyzing that repository. To make sure the data matches the commit being analyzed in CodeScene, keep these rules in mind:
Run the uploader from the repository root.
Make sure the local checkout matches the same commit or branch that CodeScene analyzes.
Run the upload immediately after the coverage report is generated whenever possible.
Coverage data will only be used during analysis if it was produced for the same or an ancestor commit. If the coverage data is for an ancestor commit, data won’t be shown for files that have changed since that commit.
CodeScene does not merge coverage data for a single file across different uploads. If multiple uploads contain data for the same file, the most recent applicable upload is used.
Coverage data is uploaded per Git repository.
Uploaded coverage data only becomes visible in the Project Dashboard after a new analysis runs (see Step 5: Run or wait for a new analysis).
Golden path: GitHub Actions
This example shows a complete GitHub Actions workflow for uploading coverage data to CodeScene. Replace the test command and coverage file path with the values used by your project.
name: Upload Code Coverage to CodeScene

on:
  push:
    branches:
      - main
  workflow_dispatch:

jobs:
  coverage:
    runs-on: ubuntu-latest

    steps:
      - name: Check out repository
        uses: actions/checkout@v4

      - name: Run tests and generate coverage
        run: |
          # Replace this with your project's actual test command
          # and make sure it generates a supported coverage report.
          echo "Run tests here and generate coverage"

      - name: Install CodeScene Coverage CLI
        run: curl https://downloads.codescene.io/enterprise/cli/install-cs-coverage-tool.sh | bash -s -- -y

      - name: Upload coverage data to CodeScene
        run: cs-coverage upload --format "lcov" "coverage/code-coverage.lcov"
        env:
          CS_ACCESS_TOKEN: ${{ secrets.CS_ACCESS_TOKEN }}
What to update in this workflow:
Replace the test command with the one your project actually uses.
Make sure the test step produces a supported coverage report.
Change
--formatand the file path to match your report.Store
CS_ACCESS_TOKENas a repository or organization secret.
GitLab CI, Azure DevOps, Jenkins, and other providers
The provider does not matter as long as the pipeline does the same four things:
Check out the repository.
Run tests and generate a supported coverage report.
Install
cs-coverage.Run
cs-coverage uploadfrom the repository root.
For non-GitHub providers, the most important thing is that the upload runs in the same checked-out repository and on the same commit or branch that CodeScene will analyze.
GitLab CI example (.gitlab-ci.yml):
stages:
  - test

upload_coverage:
  stage: test
  image: ubuntu:22.04
  variables:
    CS_ACCESS_TOKEN: $CS_ACCESS_TOKEN
  cache:
    key: cs-coverage-cli-v1
    paths:
      - .codescene/bin/
  before_script:
    - mkdir -p .codescene/bin
    - |
      if [ ! -x .codescene/bin/cs-coverage ]; then
        curl -sSL https://downloads.codescene.io/enterprise/cli/install-cs-coverage-tool.sh | sh -s -- -y
        mv ~/.local/bin/cs-coverage .codescene/bin/ 2>/dev/null || mv cs-coverage .codescene/bin/ 2>/dev/null || true
      fi
    - export PATH="$PWD/.codescene/bin:$PATH"
  script:
    # Replace with your project's actual test command and coverage output path
    - echo "Run tests here and generate coverage"
    - cs-coverage upload --format lcov coverage/code-coverage.lcov
Store CS_ACCESS_TOKEN as a masked CI/CD variable under Settings → CI/CD → Variables. Caching .codescene/bin/ between jobs avoids re-downloading the CLI on every run.
Azure DevOps example (azure-pipelines.yml):
trigger:
  branches:
    include:
      - main

pool:
  vmImage: 'ubuntu-latest'

steps:
  - checkout: self

  - script: |
      echo "Run tests here and generate coverage"
    displayName: 'Run tests and generate coverage'

  - script: |
      curl https://downloads.codescene.io/enterprise/cli/install-cs-coverage-tool.sh | bash -s -- -y
    displayName: 'Install CodeScene Coverage CLI'

  - script: |
      cs-coverage upload --format lcov coverage/code-coverage.lcov
    displayName: 'Upload coverage to CodeScene'
    env:
      CS_ACCESS_TOKEN: $(CS_ACCESS_TOKEN)
Define CS_ACCESS_TOKEN as a pipeline variable (mark the token “Keep this value secret”) under the pipeline’s Variables settings.
Jenkins example (declarative Jenkinsfile):
pipeline {
    agent any

    environment {
        CS_ACCESS_TOKEN = credentials('cs-access-token')
    }

    stages {
        stage('Test') {
            steps {
                sh 'echo "Run tests here and generate coverage"'
            }
        }

        stage('Install Coverage CLI') {
            steps {
                sh 'curl https://downloads.codescene.io/enterprise/cli/install-cs-coverage-tool.sh | bash -s -- -y'
            }
        }

        stage('Upload Coverage') {
            steps {
                sh 'cs-coverage upload --format lcov coverage/code-coverage.lcov'
            }
        }
    }
}
Store the token as a Jenkins credential (Manage Jenkins → Credentials) rather than a plain environment variable.
Step 5: Run or wait for a new analysis
Uploaded coverage data only becomes visible in the Project Dashboard after a new CodeScene analysis runs. If your project is already analyzed automatically, wait for the next analysis.
To trigger an analysis manually via the REST API:
 curl -X POST -H 'Accept: application/json' -H 'Authorization: Bearer <token>' \
 'https://api.codescene.io/v2/projects/{project-id}/run-analysis'
Replace <token> with the token you created in Step 1, and {project-id} with your project’s ID. If you don’t already know the ID, list your projects with the same token to find it:
 curl -X GET -H 'Accept: application/json' -H 'Authorization: Bearer <token>' \
 'https://api.codescene.io/v2/projects'
See Public API for more on authenticating against and using the REST API.
Step 6: Verify the results in CodeScene
After the next analysis completes, verify the result in these places:
Code Coverage dashboard: review overall coverage, hotspot coverage, uncovered files, and trends over time (see Using Code Coverage).
Explore view: inspect code coverage on the system map and drill down to folders and files.
Analysis warnings: if coverage does not line up with the analyzed commit, check warnings in Project Dashboard → Scope → Analysis Data → Analysis Warnings.
Common mistakes and what to check
Coverage is not visible in CodeScene
Check the following:
A new analysis has run after the upload.
The upload used the correct repository checkout (same branch and commit as the project CodeScene is analyzing).
The upload was performed from the repository root.
The
--format(lcovunless you set it) and file path match the generated report.If you generated coverage locally, you used the same repository URL when cloning locally as configured in the CodeScene project.
Verify what coverage data has been uploaded using the REST API (see List Data).
Some files show no coverage
This can happen when:
Coverage was uploaded for an ancestor commit and those files changed afterwards.
Coverage is only generated for part of the codebase.
A language or repository in a larger setup is not covered yet.
The results look incomplete or misleading
Remember:
CodeScene only uses coverage data that matches the same commit or an ancestor commit.
If coverage is from an ancestor commit, files changed since then will not show coverage data.
CodeScene does not merge coverage data for the same file across uploads.
Authentication errors (401/403)
Check the following:
CS_ACCESS_TOKENis set, and has not expired or been revoked (see Client setup).The token has the permissions required for the Coverage CLI.
On-prem only:
CS_ONPREM_URL(orCS_ONPREM_API_URL) points to the correct CodeScene instance, with no typos and the correct protocol.
Network or connection errors
Check the following:
The environment running
cs-coverage uploadcan reach your CodeScene instance over HTTPS.If you’re behind a corporate proxy or firewall, see your organization’s CodeScene proxy configuration documentation.
Persistent SSL/TLS certificate errors on-prem may require installing your organization’s CA certificate.
Excluding false positives from the code coverage analysis
In some cases, code coverage data might not be available for all the files in a project. Common situations where this could arise are:
In a project with multiple programming languages, code coverage tools may not be set up for all of the languages yet.
In a project with multiple repositories, the generation and uploading of code coverage data might not be set up for all of the repositories yet.
When no coverage data is available, by default CodeScene considers the files to have 0% coverage. Those files would therefore appear in red inside the system map and the 0% scores would have a negative impact on the code coverage averages that CodeScene displays. This is what we mean by “false positives” for low code coverage.
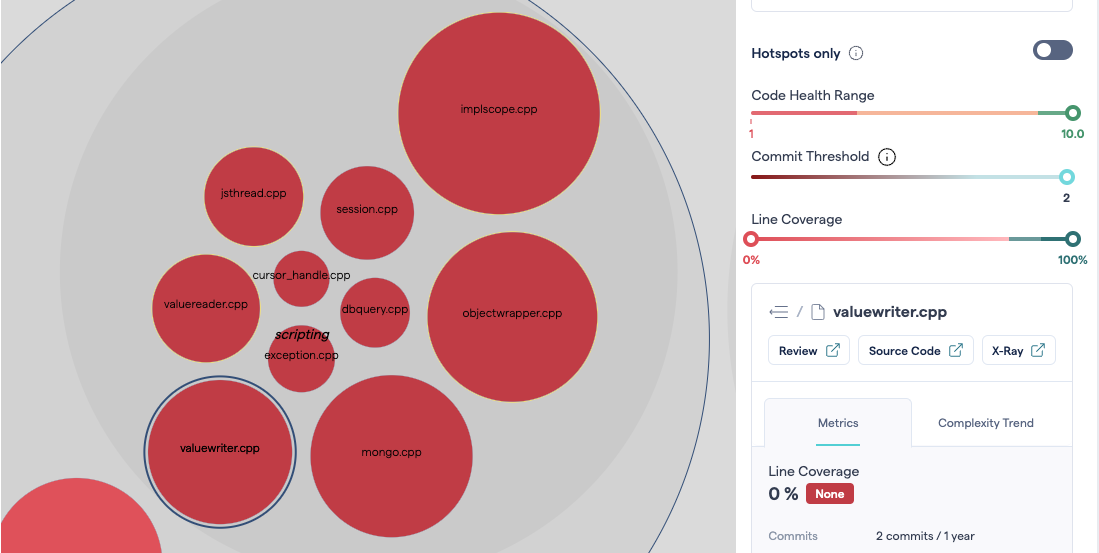
Fig. 185 A folder containing multiple files marked as having 0% code coverage. A code coverage problem, or false positives?
To avoid this, you can configure CodeScene to remove certain files and folders from the code coverage analytics. Go to the Exclusions and filters tab of the project configuration. There, you can define exclusions using glob patterns relative to the repository root of the files.
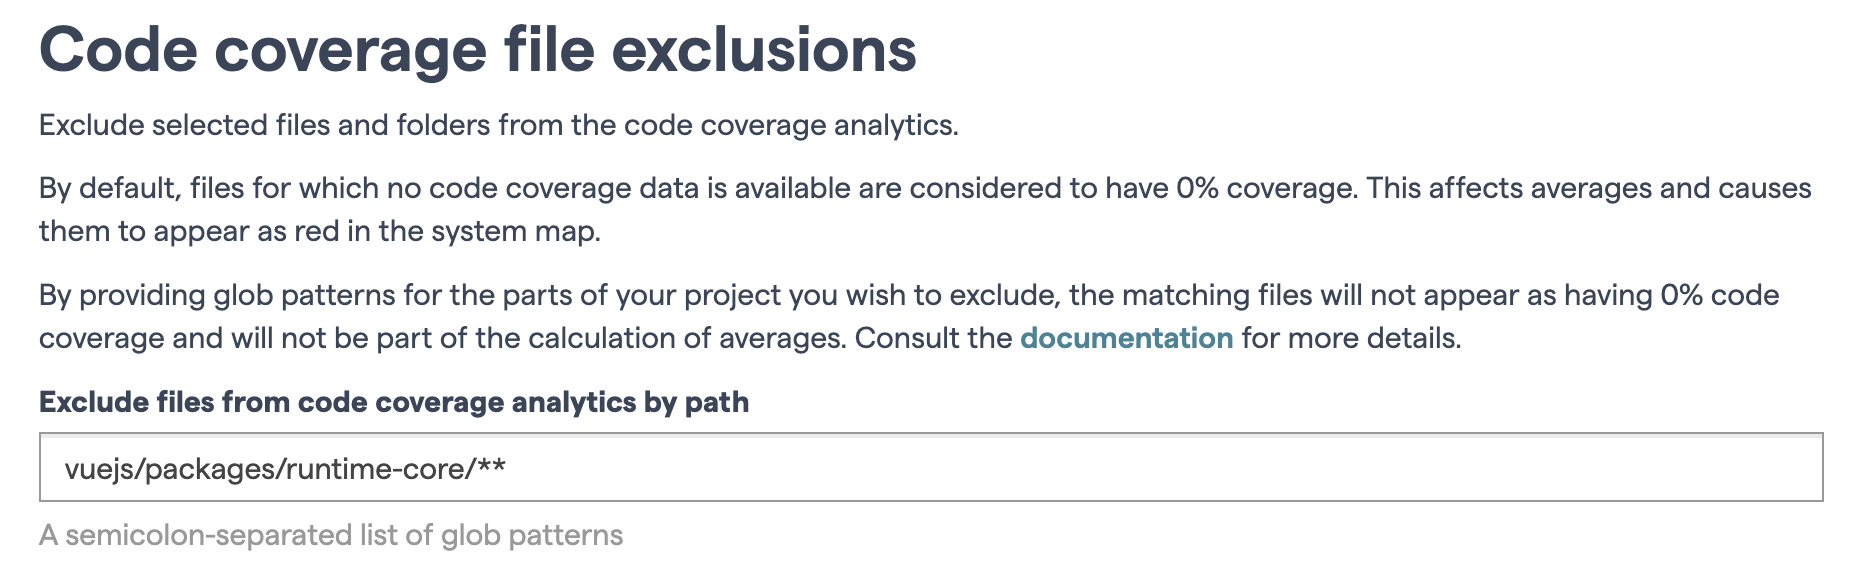
Fig. 186 Configure the code coverage exclusions.
The same setting is used by the coverage views in the project and by the code coverage gates in pull requests. A file excluded here is left out of both.
Excluded files will appear as grey circles in the system map. Their scores will not influence the code coverage KPIs and averages. For all the other metrics besides code coverage, these files will continue to be analyzed normally.
Note that files that are excluded from the analysis do not need to be excluded again here.
How coverage exclusion patterns are matched
Separate patterns with a semicolon, for example **/*.test.ts;**/*.spec.ts;**/__tests__/**.
The patterns use the same glob syntax as the other file exclusions, see Exclude Specific Files and Folders from an Analysis.
The first path segment of a pattern decides which repositories it applies to:
web/**/*.test.tsapplies to the repositorywebonly, at any depth inside it.**/*.test.tsapplies to every repository, at any depth.*/src/**applies to thesrc/directory at the root of every repository. A single*in the first segment stands for the repository name, not for “any depth”. It excludesweb/src/index.ts, but notweb/lib/src/index.ts. Use**/src/**to match asrc/directory at any depth.A single
*can be combined with other characters to select repositories by name, for examplerepo-*/src/**.
Some patterns are ignored:
A first segment that combines
**with other characters, such asrepo-**/src/**.A pattern without a
/, such as*.d.ts. Write**/*.d.tsinstead.**on its own excludes every file.
When a code coverage gate runs, the cs-coverage tool logs a warning that lists the patterns it ignored.
Patterns are case-sensitive, and only / separates path segments. Alternatives such as {a,b} are supported.
Extended globs such as ?(c|m) are not supported and match nothing, so copy patterns from your coverage tool with care.
For example, Vitest’s default test pattern **/*{.,-}{test,spec}.?(c|m)[jt]s?(x) excludes nothing.
Write **/*.test.ts;**/*.spec.ts instead.
Note
In earlier versions of CodeScene, the project coverage views matched a pattern starting with **/ only against
files at the root of each repository, while the code coverage gates matched it at any depth. If your version
still behaves that way, write */**/*.d.ts or web/**/*.d.ts instead of **/*.d.ts. Those forms match
at any depth in both places.
Files that are missing from the coverage report
A source file that is not in the uploaded coverage report is counted as 0% covered, unless it is excluded. Use exclusions to leave out files that are not meant to be tested, such as configuration files, generated code, and the tests themselves.
This is a common reason why CodeScene reports a lower coverage than your coverage tool.
For example, Vitest 4 only puts files that a test actually loaded into the report by default, and its coverage.exclude list is empty by default.
CodeScene then scores every other source file in the repository at 0%.
Next step: Code Coverage gates for pull requests
If you want to enforce coverage in pull requests or merge requests, continue with Check Code Coverage in Pull Requests and Merge Requests.
That setup is different from the upload flow in this guide:
Coverage uploads are for visualization and analytics in CodeScene.
Coverage gates run in CI and evaluate pull requests or build results.