
Single Sign-On (SSO)
This feature is available for accounts with the Pro plan.
Standard OAuth Login (git providers)
The standard authentication mechanism that CodeScene.io uses is based on the OAuth2.0 integration with Git providers such as GitHub, Bitbucket, GitLab, and Azure DevOps. This is the normal mode of operation but it has two downsides:
You must have a git account in the organization - e.g., you must be a member of your company’s GitHub organization. - Some people, such as managers, might not have such an account
Manual user management - Every user must be manually invited to the CodeScene account and accept the invitation by using the invitation link
Enterprise SSO
To address these challenges, CodeScene Cloud supports single sign-on based on the OpenID Connect (OIDC) protocol. You can configure SSO with Microsoft Entra or Okta.
Here’s an example SSO configuration:
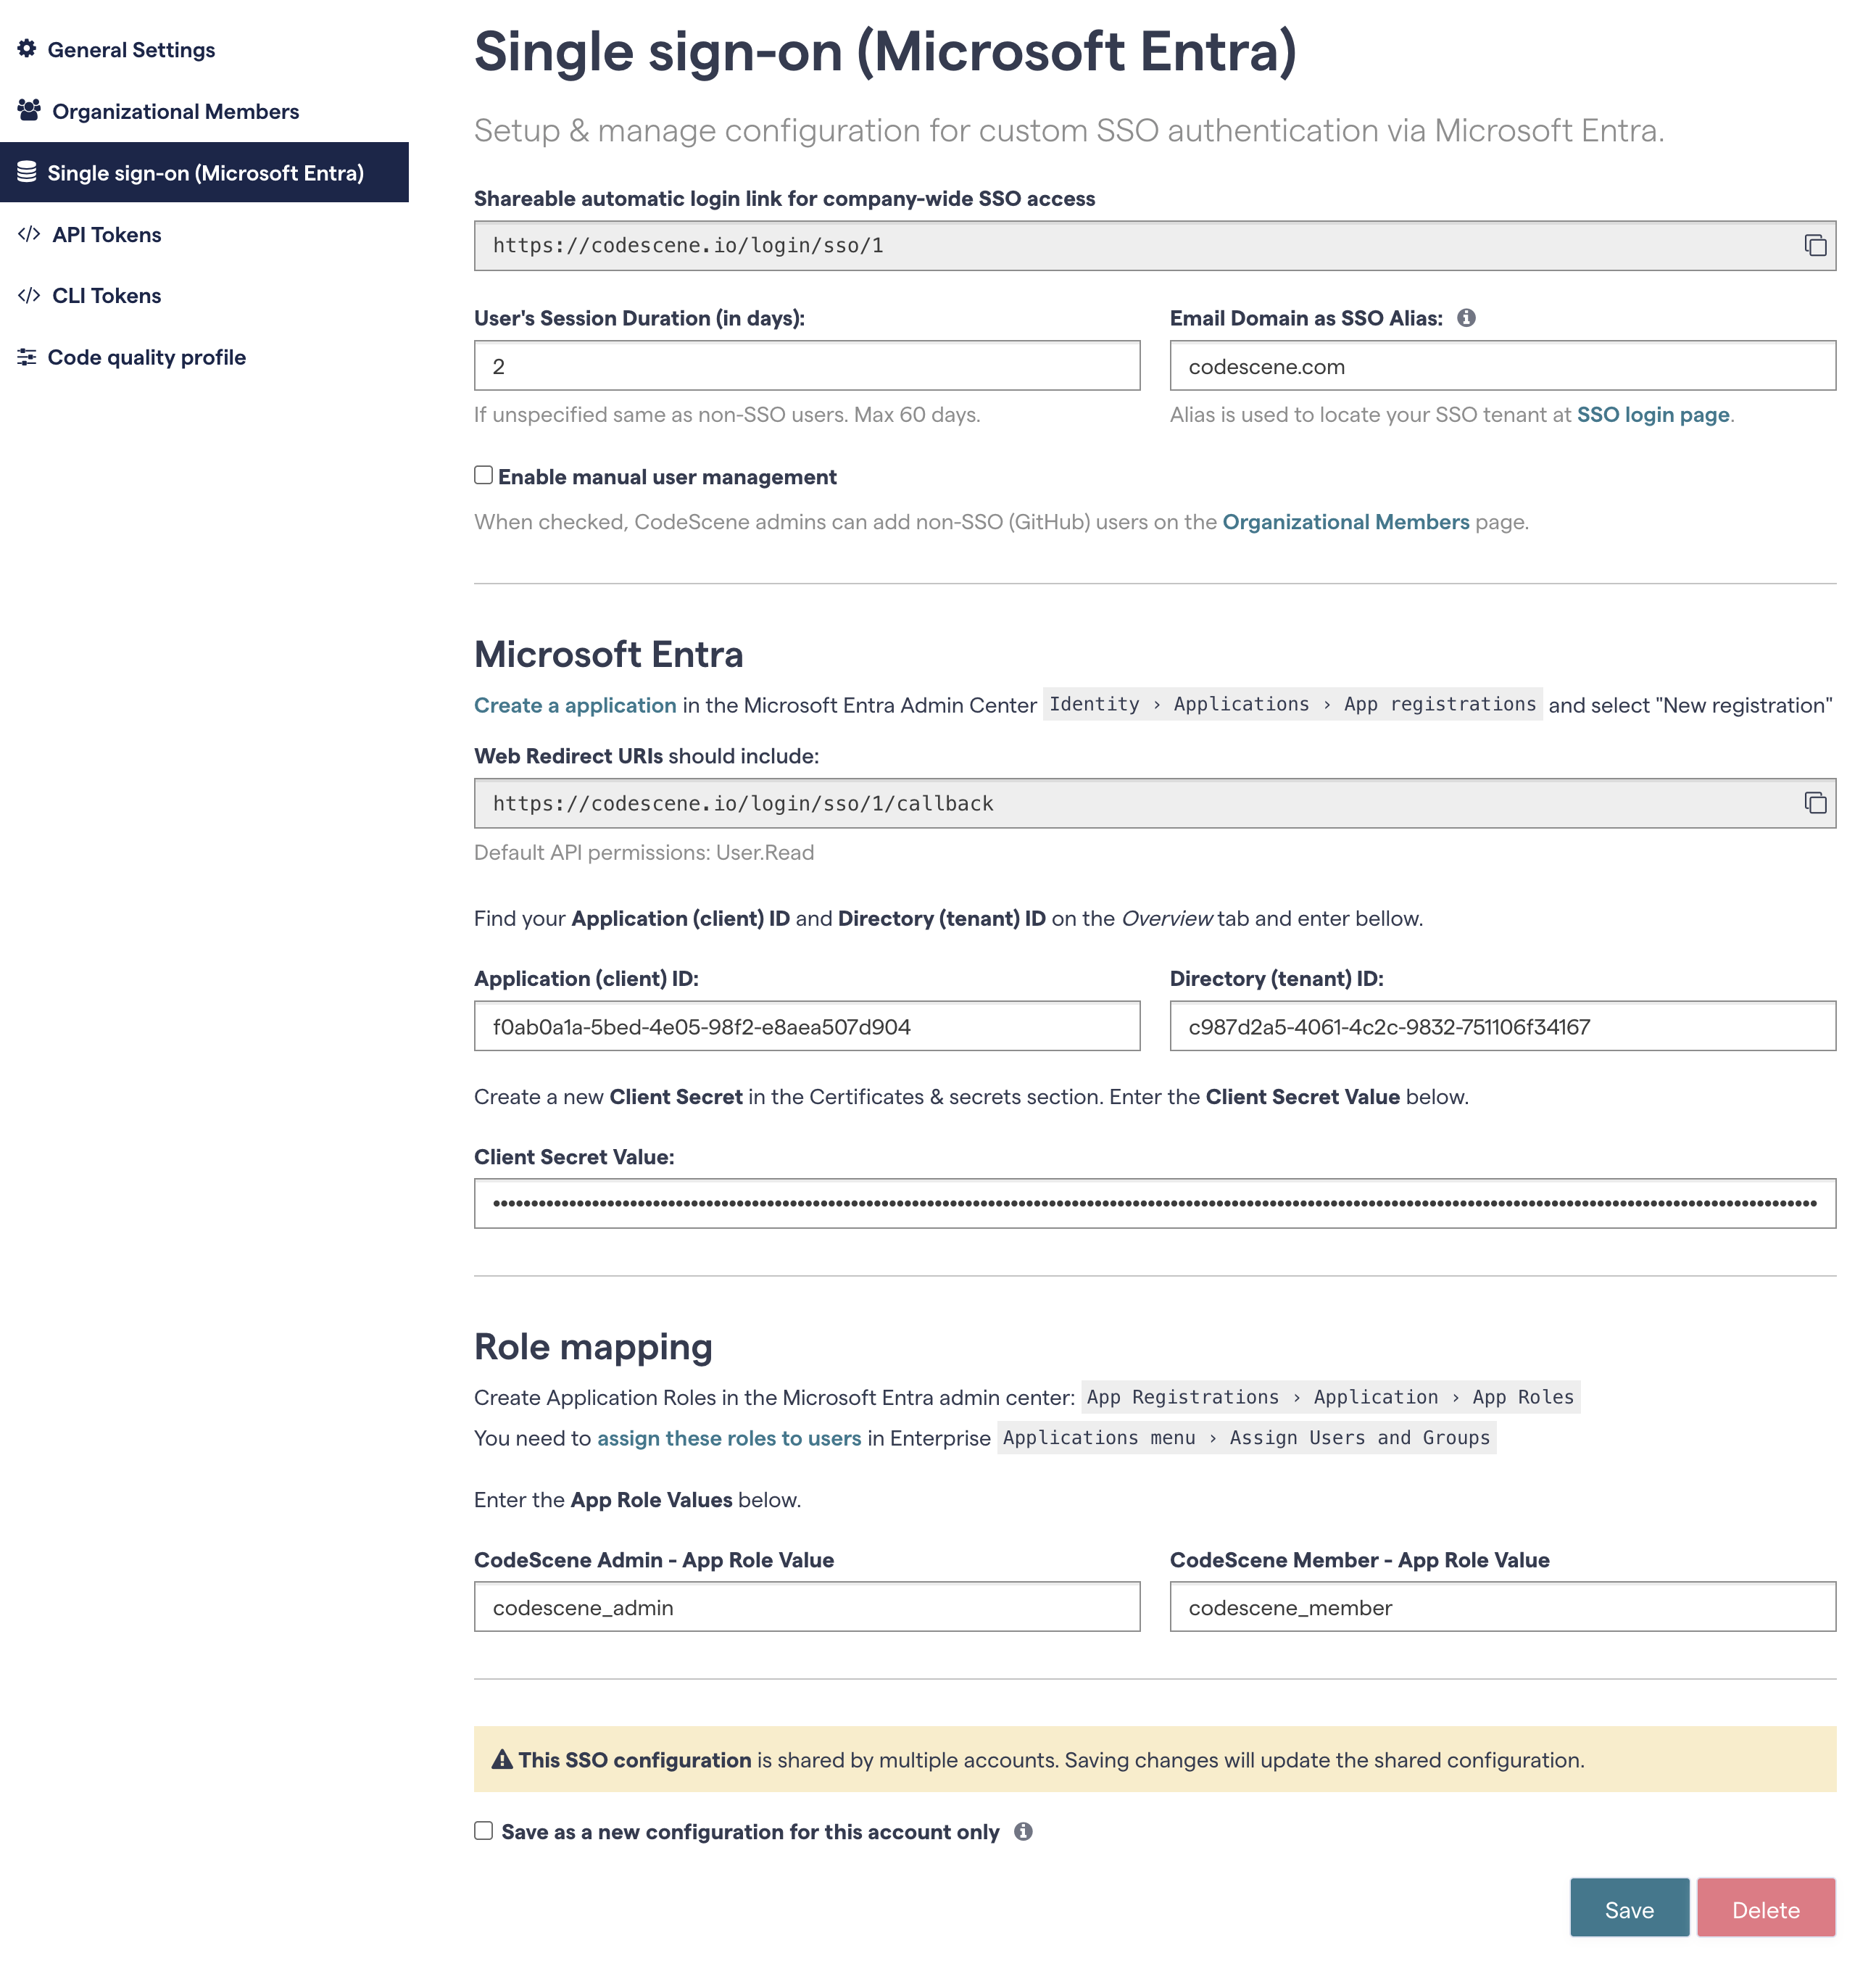
Fig. 219 Complete SSO configuration.
The configuration is explained in detail in the following sections.
SSO Setup
Microsoft Entra setup
The first step is to create a new Microsoft Entra application in the Microsoft Entra Admin center.
Choose Applications › App registrations > New registration.
Fill in the name and Redirect URI:
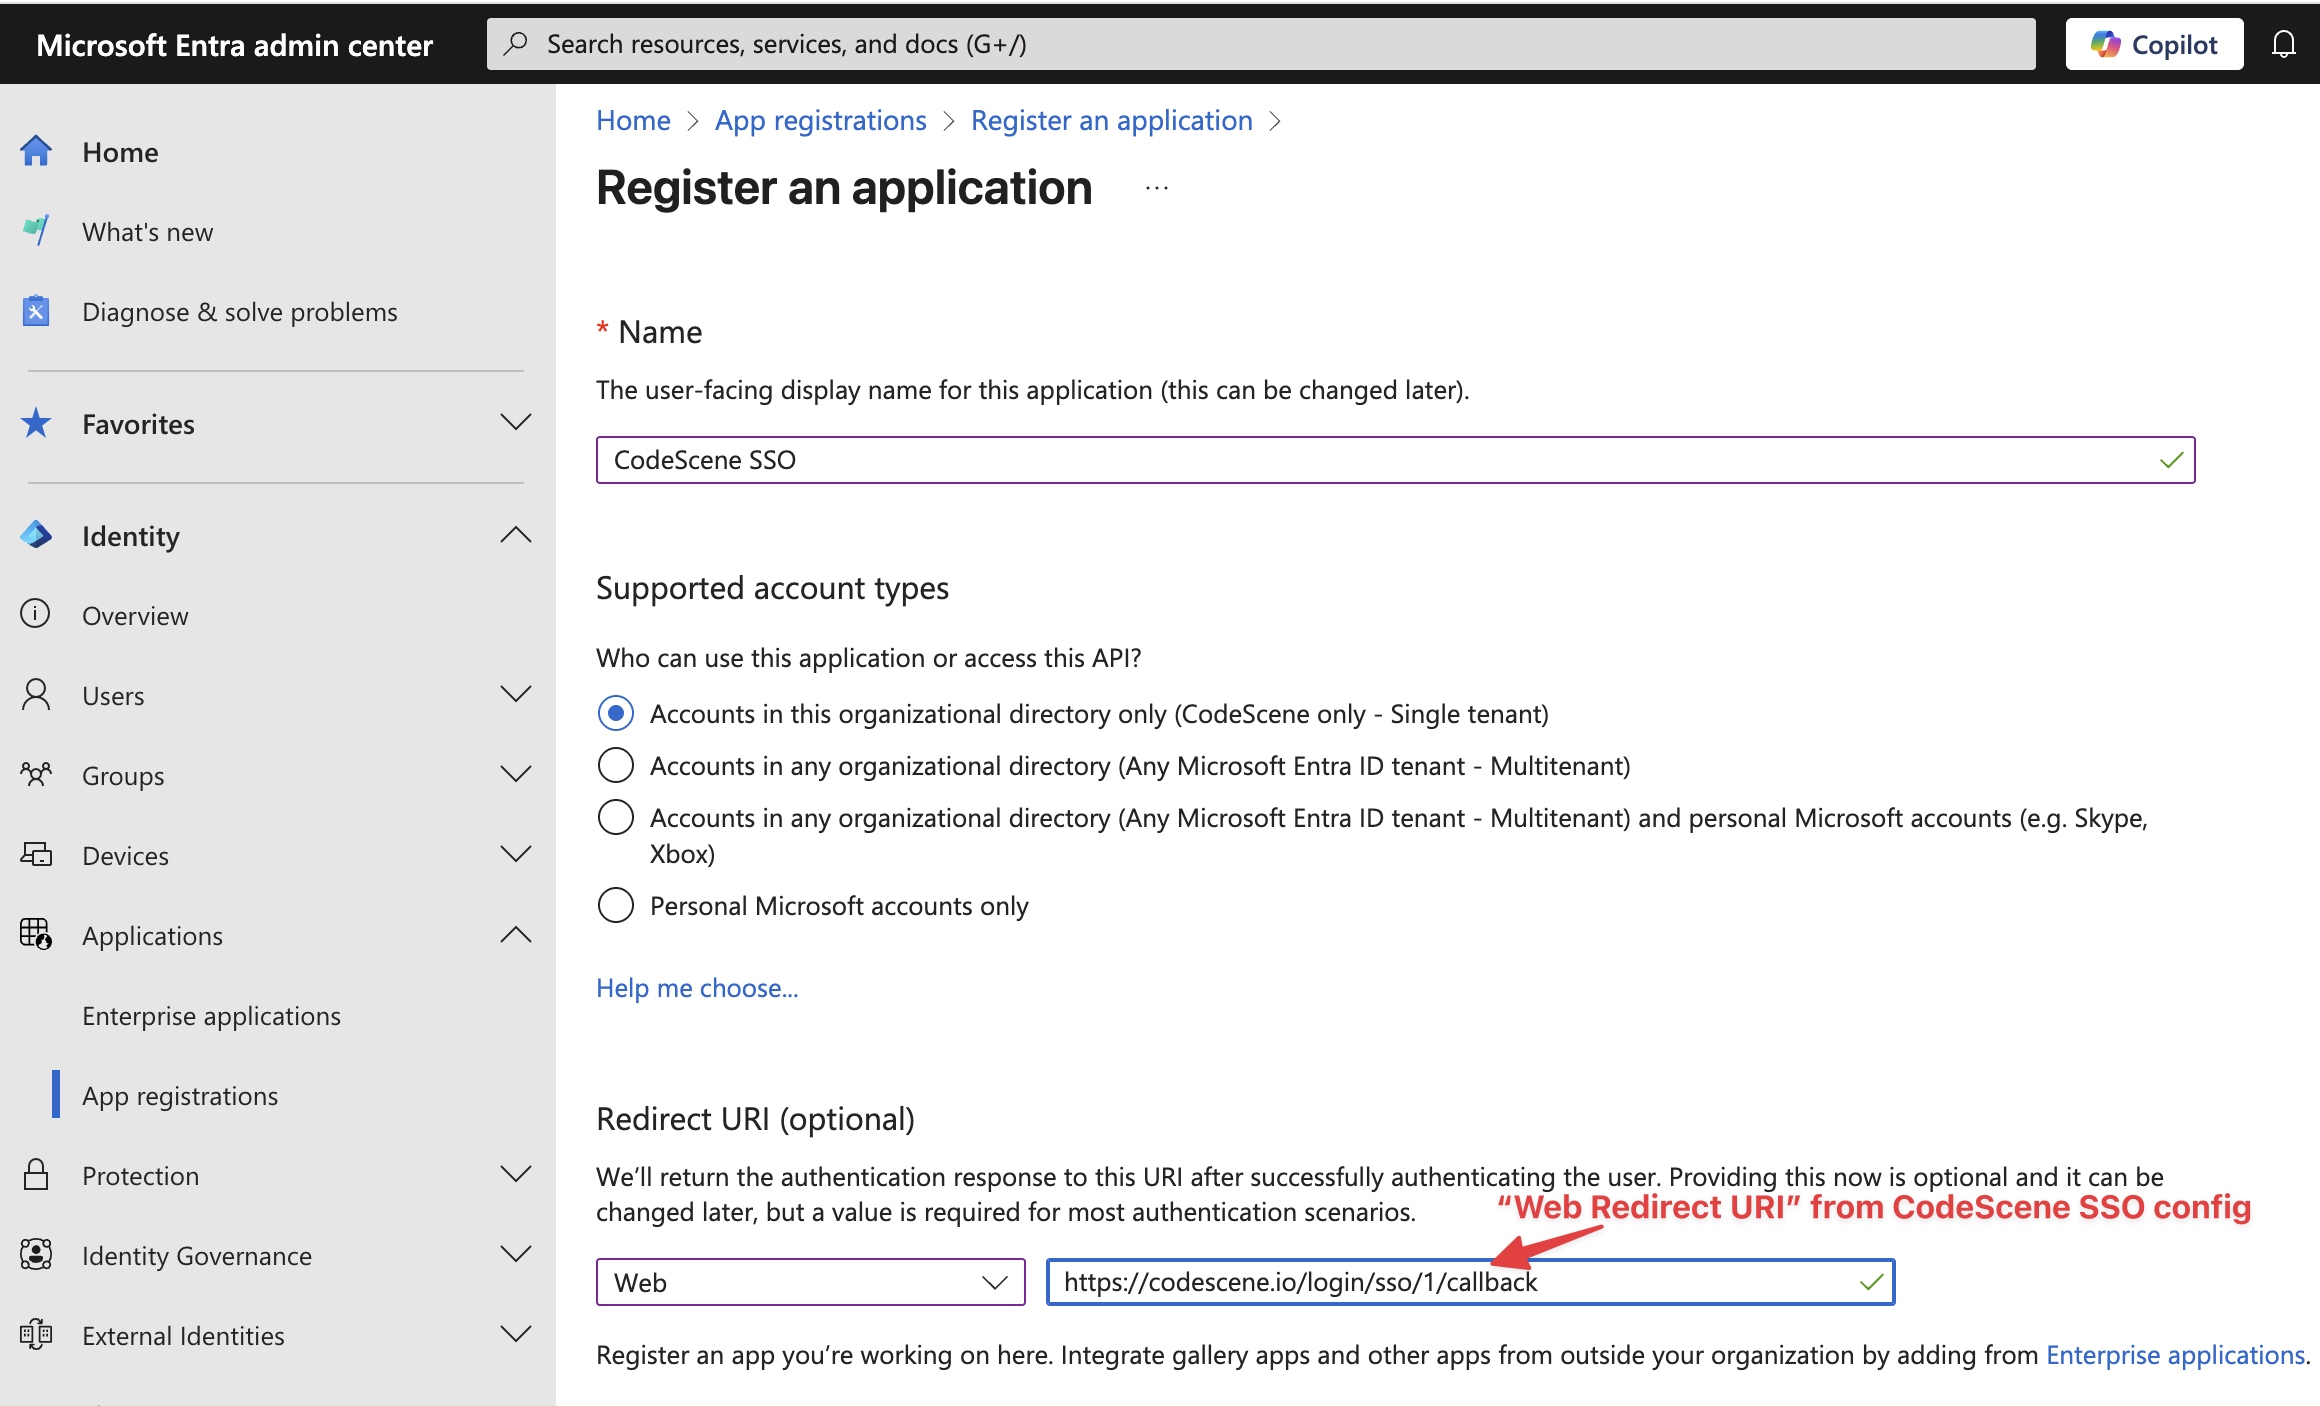
Fig. 220 New Entra app registration
Opening the CodeScene SSO configuration page reserves a tenant ID and displays the Redirect URI before saving. SSO login only works after you have saved the actual SSO configuration. Alternatively, you can skip the redirect URI specification and add it later via the “Add a Redirect URI” link in the Entra App overview page.
Proceed by copy-pasting client ID and Directory ID into CodeScene SSO configuration. You will also need to create a new client secret - follow the “Add a certificate or secret” link or choose the “Certificates & secrets” menu on the left side. We recommend using the maximum expiry time of 2 years (see Microsoft Entra app config section below).
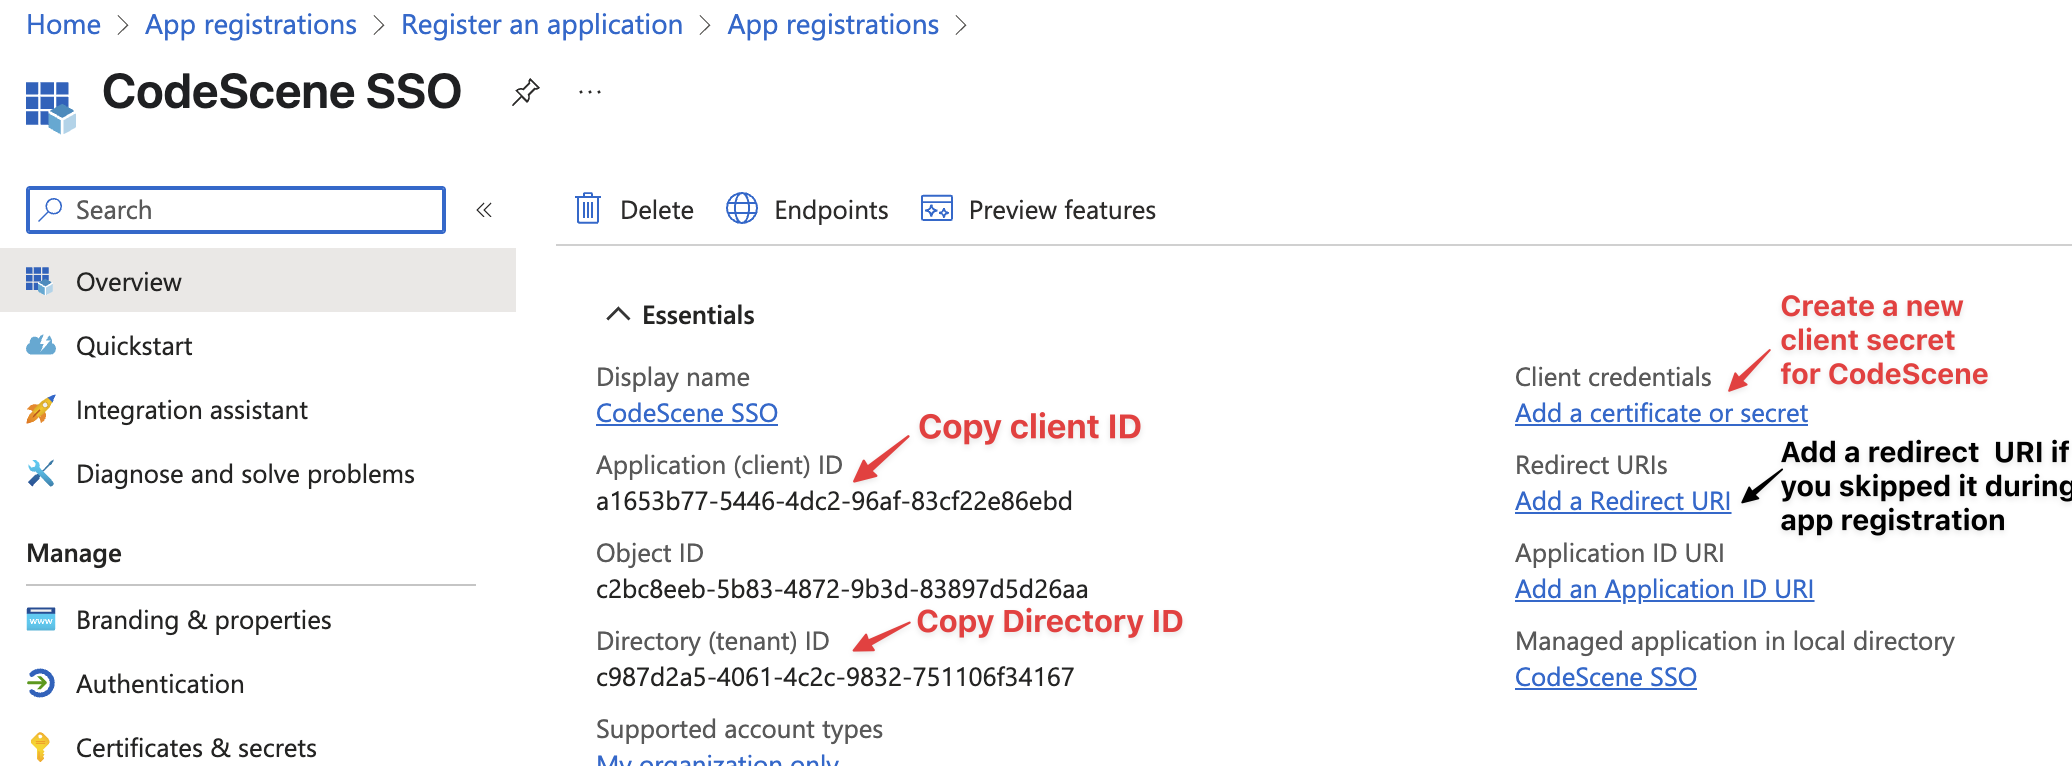
Fig. 221 Entra application configuration
CodeScene SSO config
NOTE: To setup SSO, you need to be an admin or an owner of your CodeScene org account. The owner can never be an SSO user and must log in with their Git account.
The SSO configuration page contains general settings, the selected identity provider’s configuration, and role mapping between your identity provider and CodeScene user roles. The following sections describe Microsoft Entra. For Okta, follow Okta setup below.
Generic SSO config
This is where your SSO login link is displayed. The login link has the form /login/sso/<tenant_id>, where tenant_id is the unique ID of your CodeScene SSO configuration. Opening the configuration page reserves this ID and shows the login link and redirect URI before the first save. They become active after you save the SSO configuration. Your users can bookmark this link for seamless automatic login to the application. If they aren’t already logged in to their SSO provider account they will be asked to complete the authentication step. Otherwise, they will be automatically redirected to the home page (Projects dashboard).
User’s Session Duration can be used to customize the default CodeScene session duration (10 days). We recommend keeping this value short (1-2 days) because it affects how fast changes in your identity provider (a user is removed or their roles or groups change) propagate to CodeScene. In the worst case, you need to wait a full “session duration” cycle before a removed user loses their access to your CodeScene account.
In the future, we plan to implement an automatic synchronization between Entra and CodeScene, so that users will be off-boarded / updated immediately.
Users that are removed from Entra, will typically never try to log in to your CodeScene tenant again. However, they will still show up on the “Organization Members” page (see below). If this is a concern, you can remove them manually using the “Delete” button.
SSO Alias allows you to configure a memorable alias for your tenant ID. The alias is typically your company (email) domain. It cannot be a number, because numbers identify SSO configurations. Surrounding whitespace is removed and aliases are stored in lowercase. Your users can enter this alias on the /login/sso page. This is important for a good login experience of first-time users or existing users with a new device and/or cleared cookies. See SSO login page (/login/sso) below.
Finally, Enable manual user management controls the “Add Member” button on the Organizational Members page. By default, the button is disabled when SSO is activated for a CodeScene account. This encourages administrators to manage all their CodeScene users on the SSO provider’s side. However, if you have a mix of SSO and non-SSO (git provider) users in your account, you can check Enable manual user management and then add git users manually via the “Add Member” button.
Microsoft Entra app config
We have already described how to create a Microsoft Entra application above.
Let’s recap the CodeScene configuration fields:
Application (client) ID - the ID of the specific application you have created for CodeScene SSO
Directory (tenant) ID - the ID of your Entra tenant/organization
Client Secret Value - the secret you have generated in the “Certificates & secrets” section of your Entra app config
Make sure you copied all the values from the Entra app configuration and pasted them into proper fields.
NOTE: Entra app secrets have limited validity. When they expire, your user’s experience might be disrupted and you have to promptly replace them with new credentials. To minimize these interruptions, we recommend the maximum expiry time (2 years) when creating the CodeScene app client secret.
Role mapping
After enabling SSO, no Entra users get automatic access to your CodeScene account. Instead, they must be granted specific “app roles”.
For that, you must first create these roles in App Registrations › <Application> › App Roles. You will want one role for admins and another role for members in your CodeScene account(s):
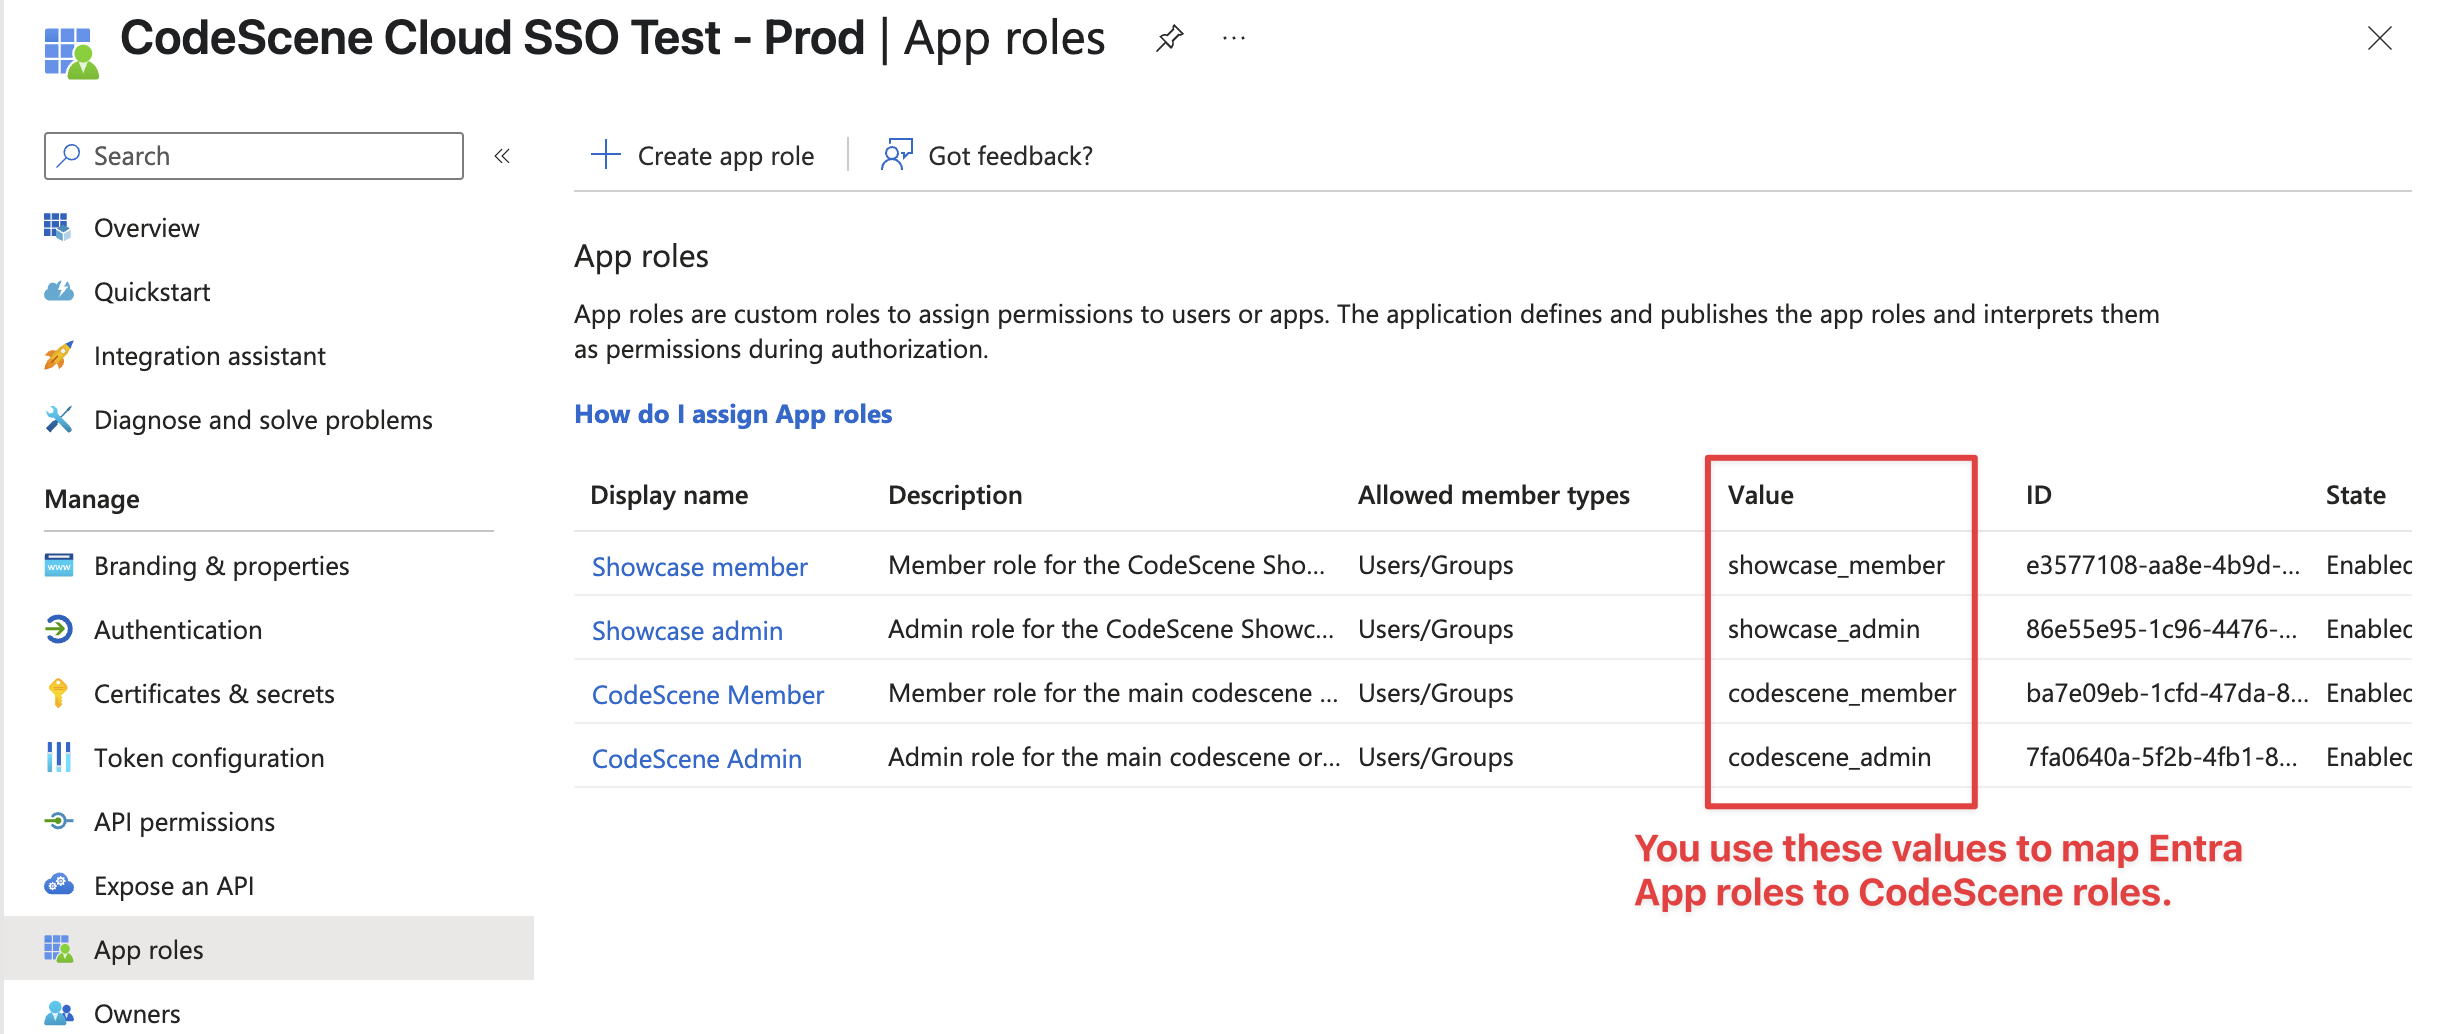
Fig. 222 Entra App Roles - two different accounts sharing the sso config (two roles for each account)
Above, we can see four roles in total because this SSO configuration (Entra Application) is shared by two different CodeScene accounts, named ‘Showcase’ and ‘Codescene’.
Then you need to assign these roles to users in Enterprise Applications menu › Assign Users and Groups:
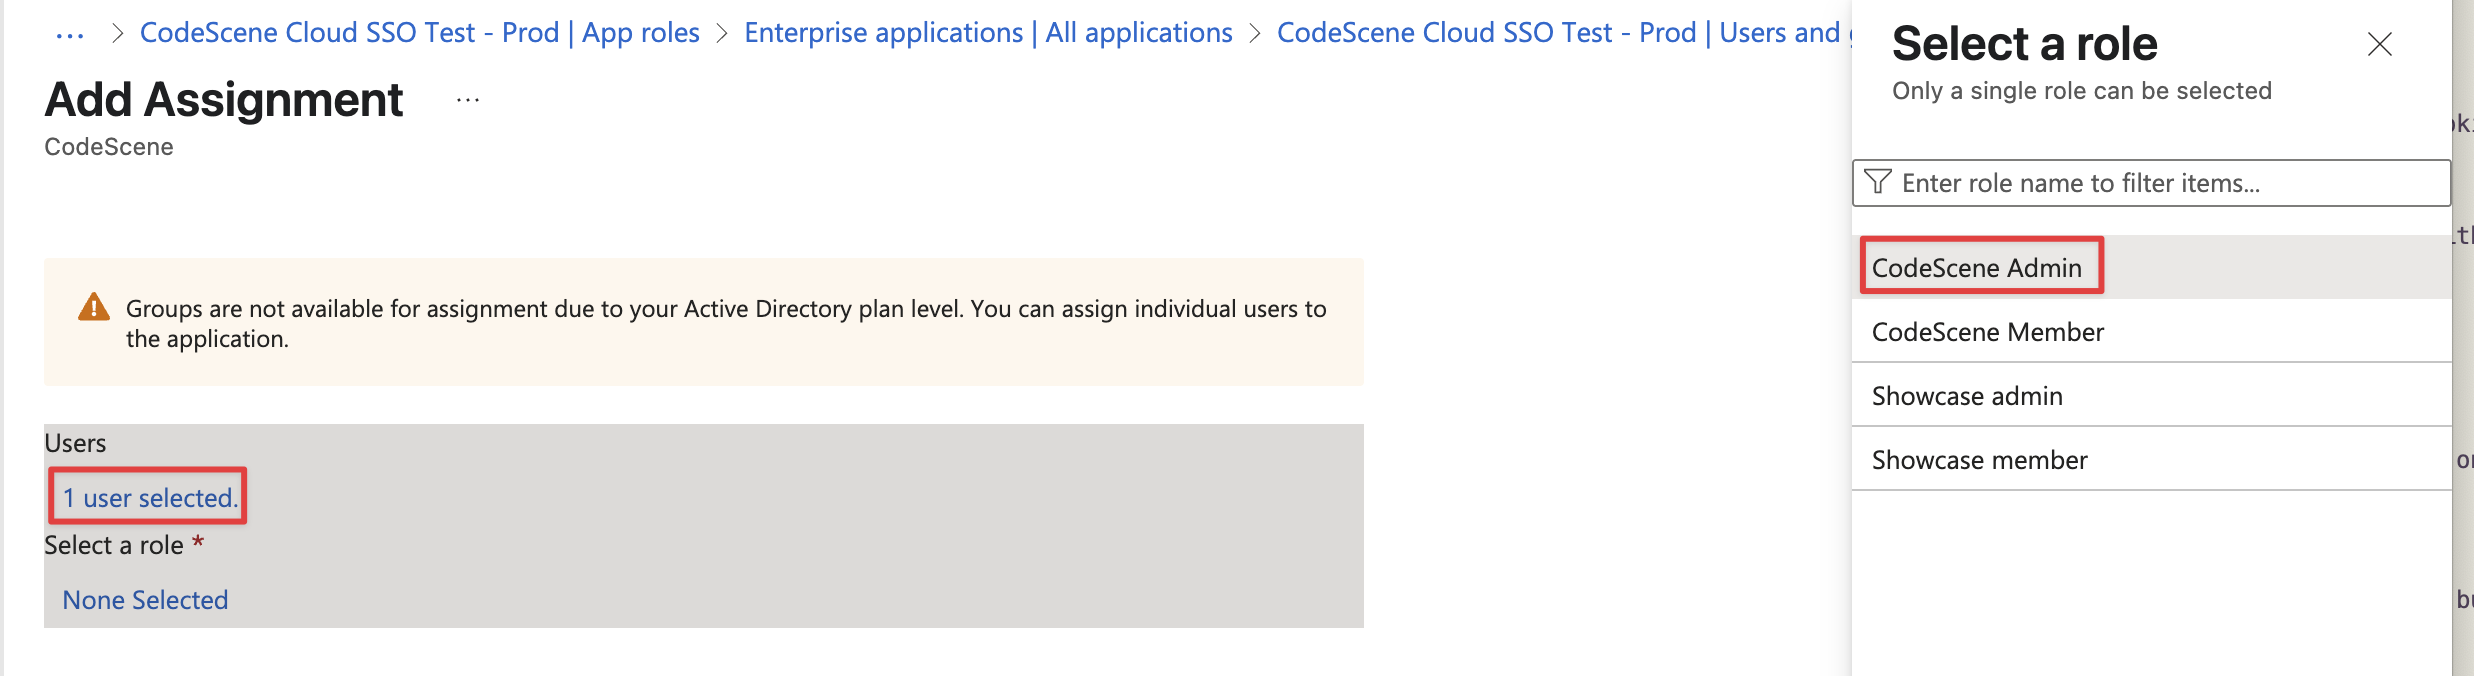
Fig. 223 Entra App Roles assignment
Okta setup
Create the Okta app integration
As an admin or owner, open Configuration > SSO in CodeScene and select Okta. Copy the Redirect URI (callback URL) shown on the page. Opening the page reserves this URL before the first save; SSO login only works after you save the completed configuration.
In the Okta Admin Console, go to Applications > Applications > Create App Integration. Choose OIDC - OpenID Connect and Web Application.
Add the callback URL from CodeScene as the Sign-in redirect URI. Copy it exactly, including its configuration ID and path.
Assign the people or groups who may sign in to the app integration.
In CodeScene, enter the Okta domain (for example,
company.okta.com), Client ID, and Client secret from the Okta app integration.
See Okta’s guide to creating an OIDC app integration.
Configure the group claim
For group-based role mapping, CodeScene needs the user’s group names in the ID token.
On the Okta app integration’s Sign On tab, add a token claim named user_groups with this expression:
user.getGroups({'group.type': {'OKTA_GROUP'}}).![profile.name]
This expression includes the names of the user’s Okta-managed groups.
See Okta’s token claim configuration guide.
Existing integrations that provide a groups claim are also supported.
Map groups to CodeScene roles
Under Okta group mapping in CodeScene:
CodeScene admin access: choose No Okta users or Users in matching Okta groups. For matching groups, enter their exact names in Okta admin groups, for example
codescene-admins.CodeScene member access: choose No Okta users, All assigned Okta users, or Users in matching Okta groups. For matching groups, enter their exact names in Okta member groups, for example
engineering, developers.
Separate multiple group names with commas. A user matches when at least one of their groups matches a listed name. By default, admin access is disabled and member access requires matching groups; an empty group list grants no access. Assigning a user to the Okta app allows them to authenticate, but they also need a matching CodeScene role to access your account.
Save and verify sign-in
Save the completed SSO configuration, including role mapping. Keep your owner login available and open the CodeScene SSO login link in a private browser window. Sign in as an assigned Okta user and confirm they can access the intended account with the expected role.
If sign-in fails, check that the redirect URI matches CodeScene’s callback URL and that the user is assigned to the Okta app.
If the user authenticates but cannot access the account, check the CodeScene role settings and the exact group names
in the ID token’s user_groups or groups claim. Changes to group membership or app assignment do not immediately
end an existing CodeScene session; see User’s Session Duration above.
Multiple CodeScene accounts sharing the same SSO config
Some organizations have multiple CodeScene org accounts because they have multiple different Git (e.g. GitHub) organizations. In that case, you most likely want to create a single Entra application and share the SSO configuration between all your CodeScene accounts.
Accounts sharing an SSO configuration must use the same Git provider. Your current login must be an admin or owner of both the account being linked and at least one account already using the target SSO configuration. Entering identical settings or the same alias does not link accounts.
To share a configuration, configure SSO in one account first. Then, for each other account:
Sign in with a Git-provider user that is an admin or owner on both sides. Separate SSO logins are separate user identities; roles belonging to different logins cannot be combined to authorize linking.
Switch to the account on the My Accounts page and open the SSO configuration page.
Expand SSO cross-org links and enter the other configuration’s alias or ID. The ID is the number at the end of its SSO login link.
Choose Link organization and confirm the change. The link takes effect immediately.
An account can link to another configuration even when it already shares its current configuration.
Linking moves only the current account to the target configuration and removes its previous SSO access. Other accounts using the previous configuration are unaffected. The current account keeps its Role mapping when both configurations use the same SSO provider type (for example, both use Microsoft Entra). Otherwise, SSO users have no access until its admins configure role mapping.
The top of the SSO configuration page lists all organizations using the current configuration and marks the current organization. Admins of any of these accounts can update the shared settings; saving applies to all accounts using the configuration. Role mapping remains specific to each account.
When multiple accounts share a configuration, Unlink this organization creates a separate copy of the settings and role mapping for the current account, with a new configuration ID and no alias. Update your identity provider with the new Redirect URI (callback URL) shown on the page, distribute the new login link, and set a new alias if needed. Other accounts keep the original configuration and URLs.
Delete removes only the current account’s link to its SSO configuration and its SSO access. It does not delete a configuration still used by other accounts or affect their SSO access.
Here’s an example of two different accounts sharing the same SSO configuration, but using different roles (see also the Entra App roles shown in the previous section):

Fig. 224 CodeScene SSO config - role mapping - ‘CodeScene’ account

Fig. 225 CodeScene SSO config - role mapping - ‘Showcase’ account
SSO login page (/login/sso)
After you configure SSO for your CodeScene account, users granted access through the selected identity provider’s role mapping can log in using the /login/sso page.
First-time users will need to enter your SSO tenant alias (typically a domain name) or ID:
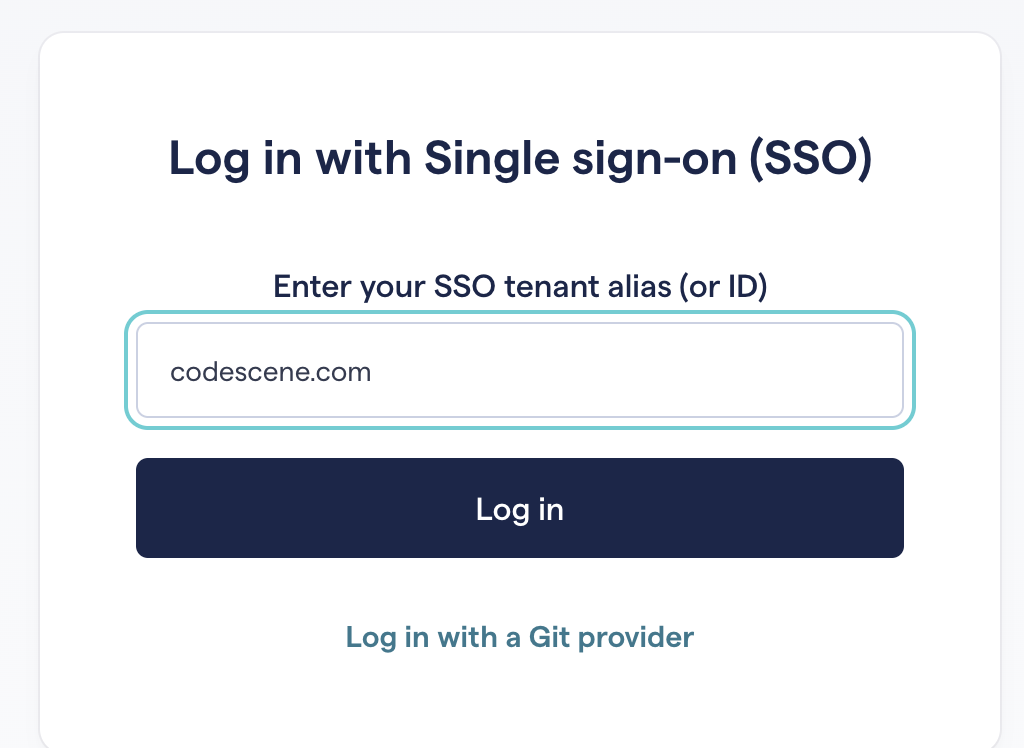
Fig. 226 SSO login page.
Alias is less important for returning users because their tenant ID will be stored in a browser cookie and they can use the quick login button:
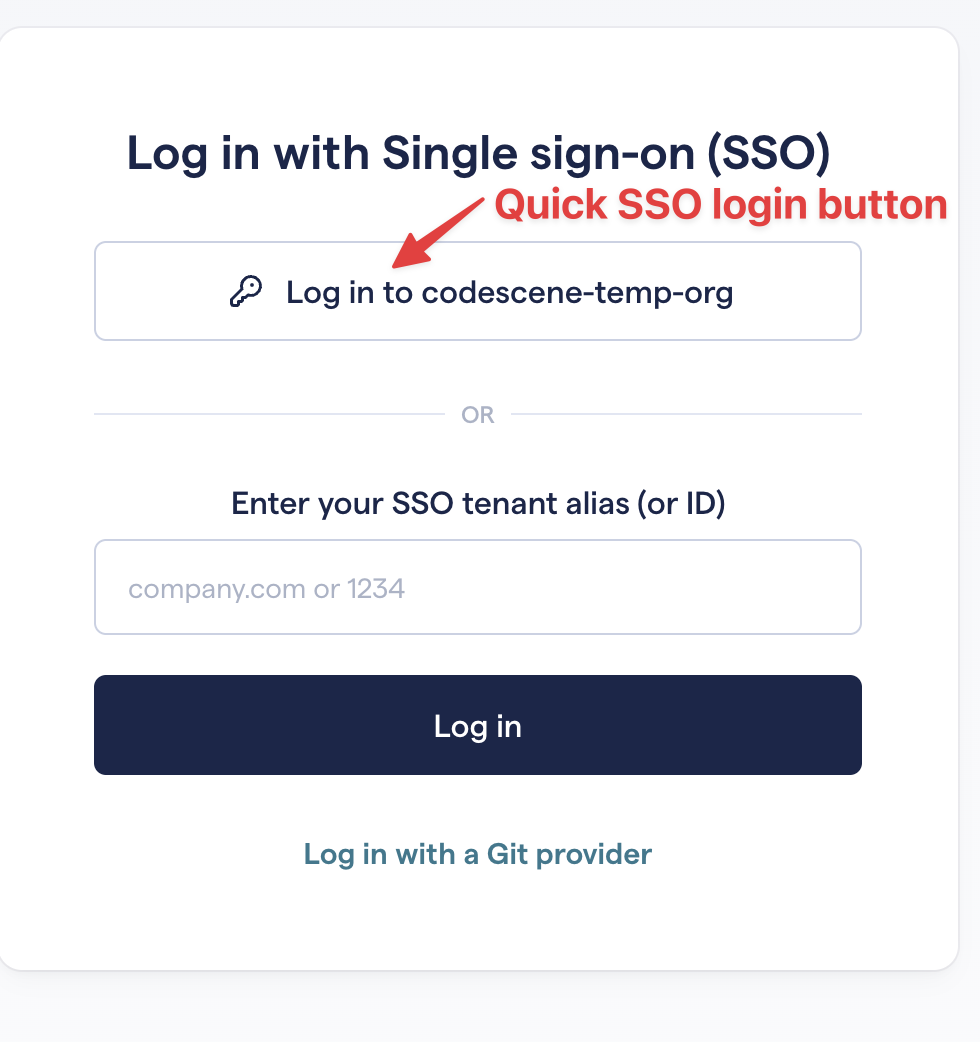
Fig. 227 SSO login page - quick login button
A similar button will be displayed on the main login page (/login) too.
After we release the feature to the general public, there will also be a link to the SSO login page on the main login page.
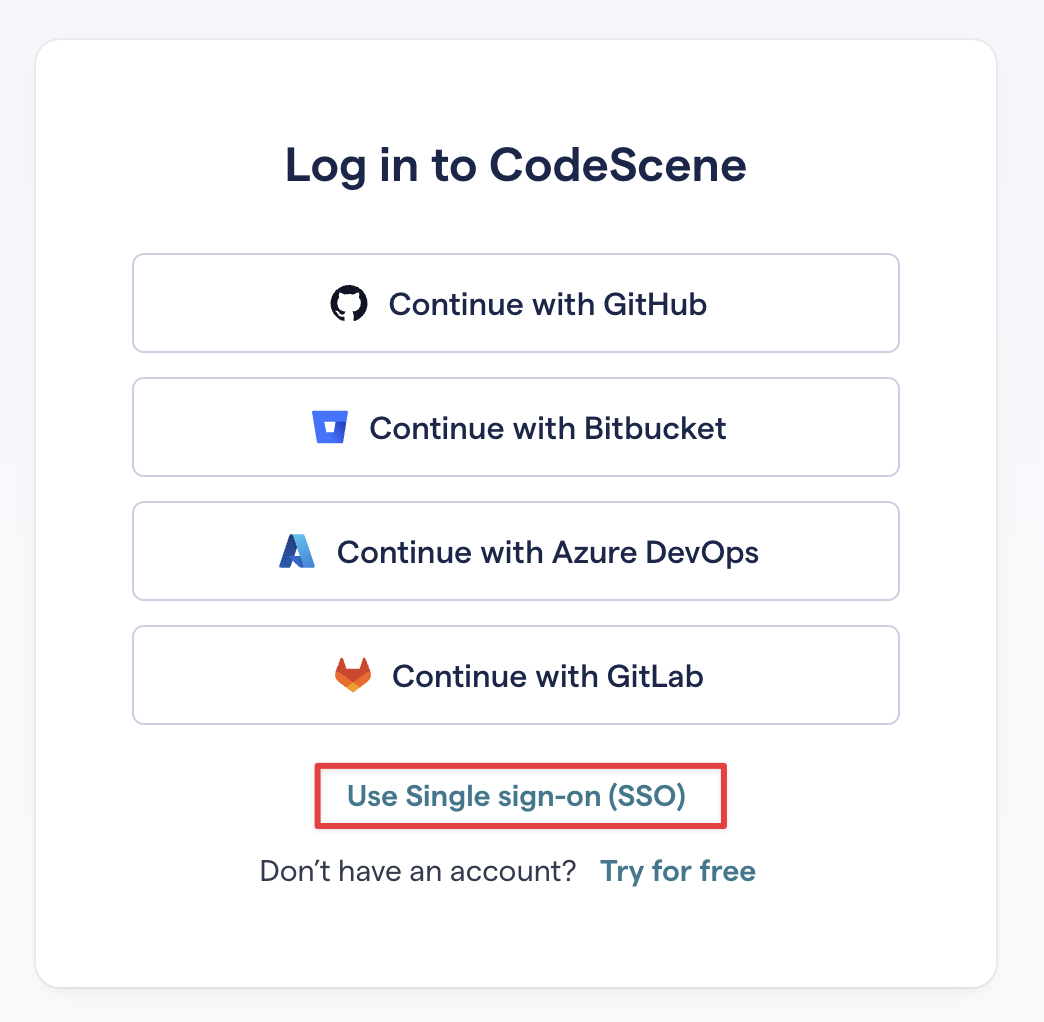
Fig. 228 Main login page with SSO link
Organization members
With SSO, most user management is automatic so you might not need to use the Organizational Members page at all.
However, it can be useful if you can get a quick overview of your actual CodeScene users, have a mixture of non-SSO (git) and SSO users, or need to remove users manually.
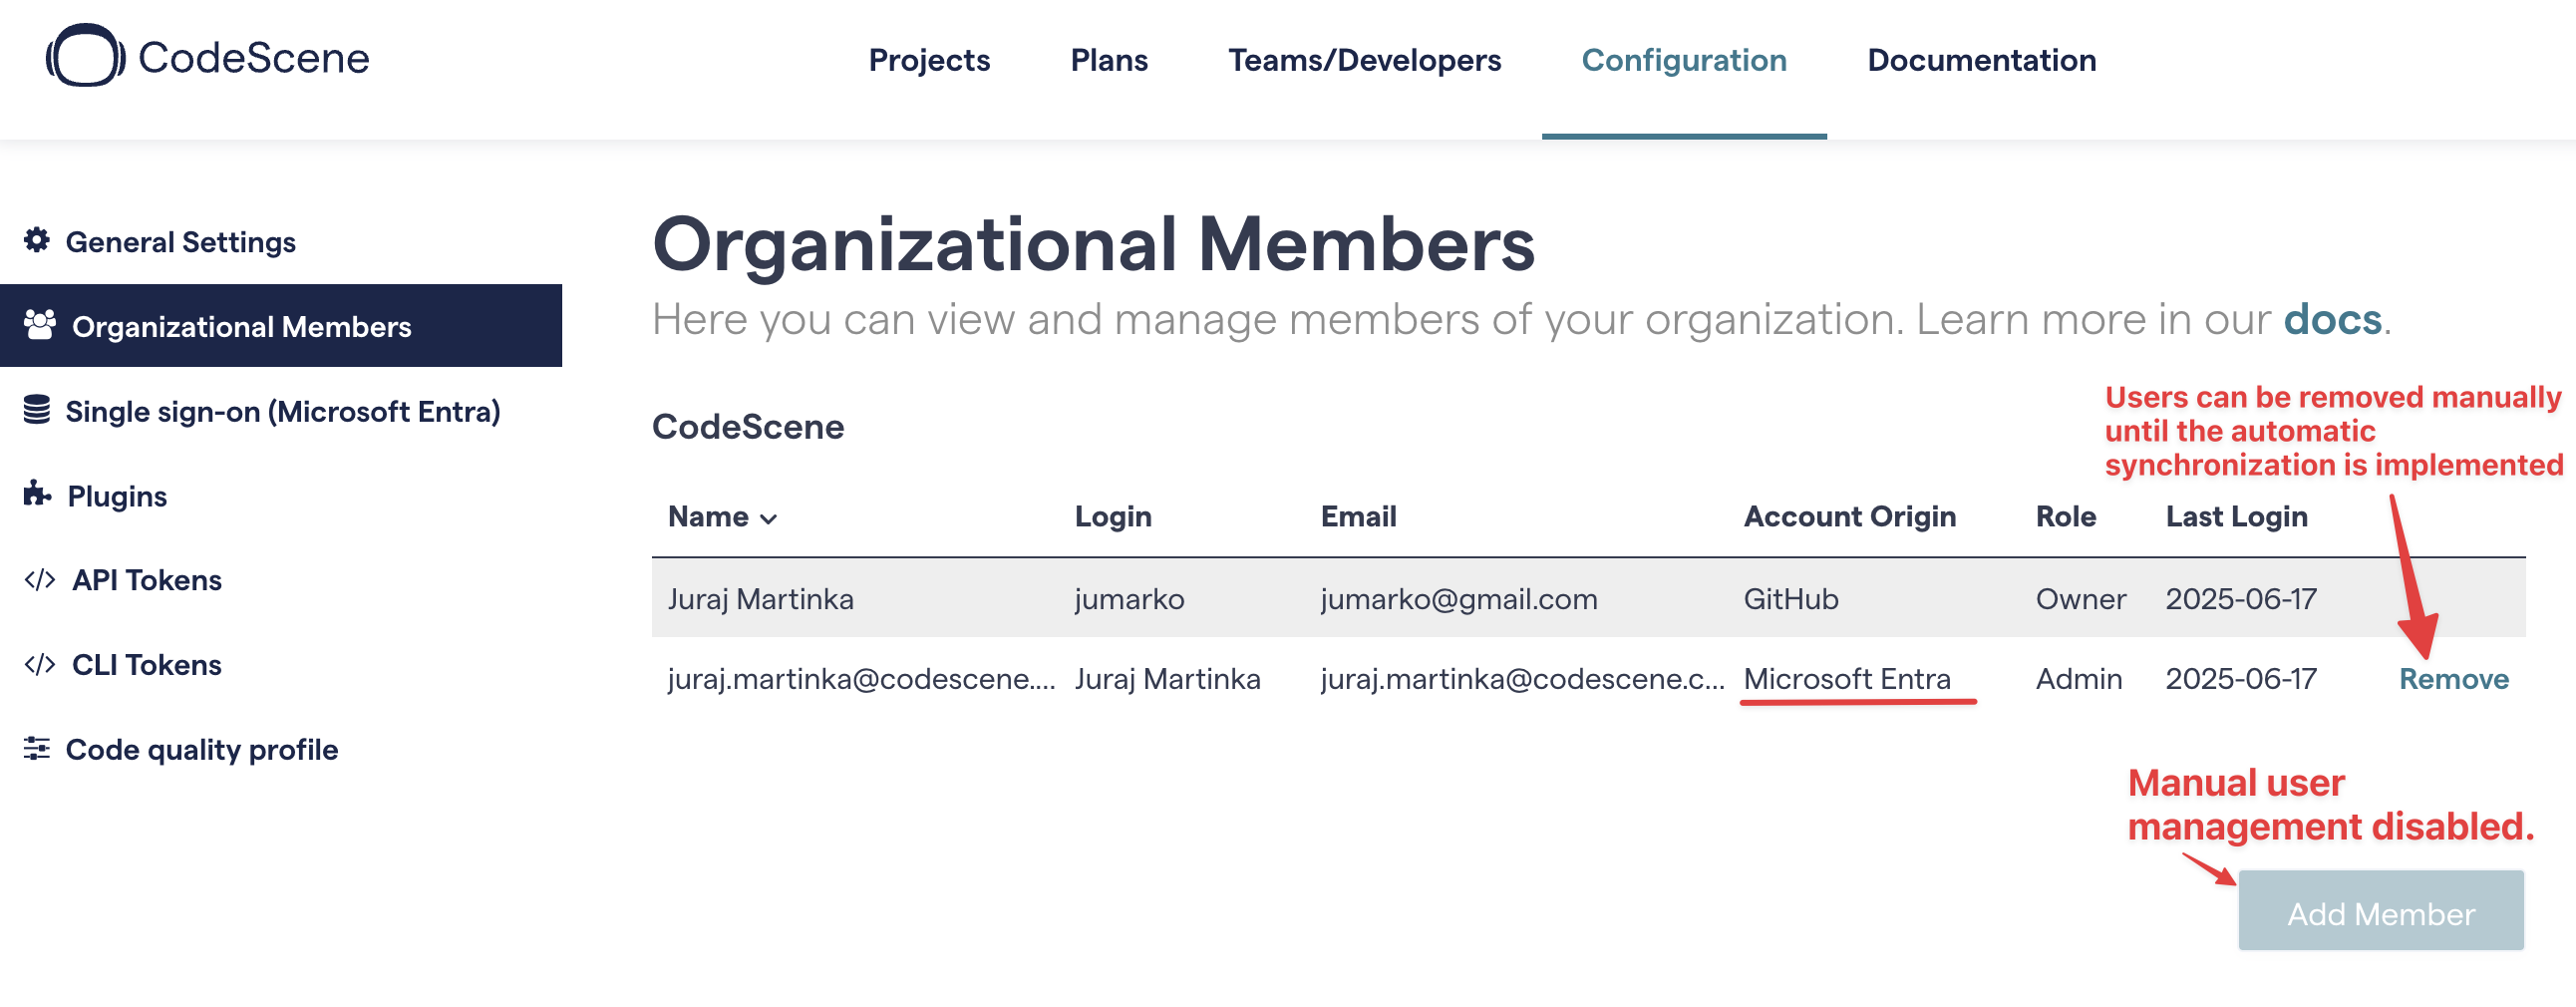
Fig. 229 Organizational Members page - showing one SSO user